A Scarf Marionette
Making a Marionette out of a scarf
A scarf marionette is a very elegant puppet that can walk, sit, crawl, and even fly. You can make a simple one in probably less than 45 minutes, or you can get "fancy" and add details and decorations. Start with the simple one and see how you like it!
WHAT YOU WILL NEED:
Materials
1 scarf, the big, silky kind works best. (If you don't have a scarf you can cut a square of slinky, silky type fabric, about 1 yard (or 1 meter) square.
1 triangle piece of stiff cardboard, about 8-12 inches on a side
5 wooden beads with holes big enough to pull the corners of the scarf through. One inch diameter beads are good.
String (like kite string) or thread, to string your puppet
Tools
Needle (Optional, to sew the thread onto the puppet...if you don't want to sew, you can just tie the thread on...it will work just as well.)
Scissors
LETS GET STARTED!
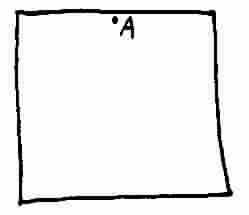
Lay out the scarf and find the center of the top edge of the scarf (point "A" in the drawing below.) HINT: To find center-point A easily, you can measure with a ruler, or just fold in half with the two top corners together; the fold will be right in the center!
Take the cloth at point A, and pinch it together so you can push it through the hole in one of the wooden beads (this will be the head, so if you have a bigger bead you can use it here if you wish, but any size will do.) Tie a simple overhand knot in the fabric above the bead so the bead will not slip off of the scarf. (see the next drawing, below.)
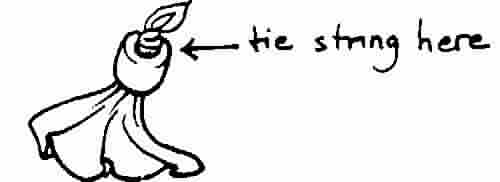
Then you can tie your first string or thread to the knot above the wooden bead. This will be your head string for your puppet. HINT: Make the head string about 3 feet long for now, you can always shorten it later.
Now you are ready to put beads with knots on all four corners of the scarf, like in the drawing below.
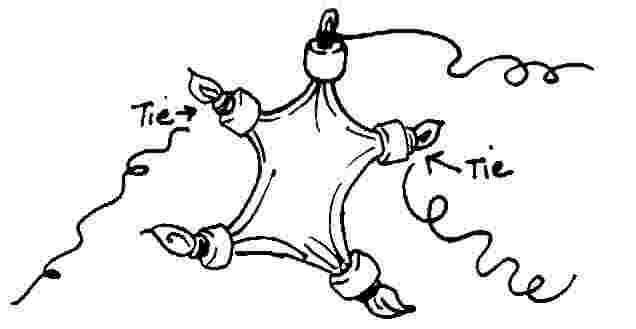
Next you can tie on strings to each hand like you did on the head (but don't tie them on the feet. You won't need them there.
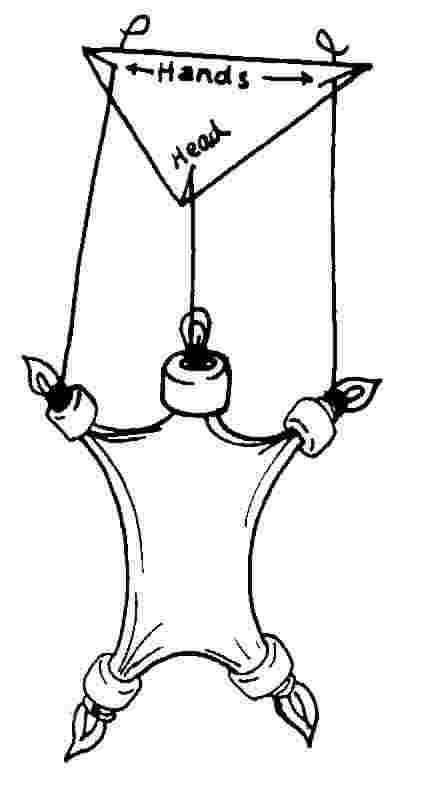
Now your scarf marionette is ready for the controller. Take your triangle of cardboard and cut a small slit in each corner. Slide the string into the slits as shown in the drawing below. The head string should go in the center corner of the triangle that faces back (towards the back of the puppet.) The slits should hold the string but allow you to adjust the length of the strings until you have them just the way you like them.
Adjusting your controller strings: The cardboard triangle should be more or less parallel to the floor when you work your puppet. You should adjust the length of the strings by sliding them up or down in the slits in the cardboard until you can hold the cardboard triangle controller at a comfortable height when your puppets feet are on the floor. Adjust the head string length first, and then adjust the arm strings so they are of equal length to each other. Practice a bit with your puppet before attaching the strings permanently (wrap the strings a few times through the slits when you like the length and then tape them so they won't come out--that way if your strings get tangled, you can undo them from the cardboard easily to untangle them.)
PRACTICING WITH YOUR PUPPET
Now your are ready to make your puppet walk! "Wait!" you say. "How can I make my puppet walk when there are no strings to control it's legs?" I am glad you asked that question, because the answer is very easy. Are you holding your puppet with the triangle parallel to the ground? Is the point attached to the head pointing back? Good. Now, I want you to tip the controller to the side so that the left arm raises up in the air. Did you notice that the left leg lifted up too? (If it didn't, try adjusting the length of the arm strings so that it will.) With the leg lifted up, move the puppet slightly forward, then lower the left arm and leg and lift the right. Move the puppet slightly forward again. This is how you walk your puppet, moving it forward while you rock it back and forth.
Advanced movement with your puppet: There are so many things you can do with your puppet that you can discover on your own, but these few hints might help get you started. Make your puppet "walk" with its hands on the floor; now it is crawling! Now, imagine where your puppet's bottom is. Hold your foot out and make the puppet back up to your foot and sit its bottom down on your foot. Pretty good! And now for the fantastic part (don't try this yourself!) Swing your puppet gently through the air; it's flying!
Your puppet is just great the way it is, but if you want to decorate it or put a face (or hands) on it you can. Remember not to glue or sew too much to the scarf. You don't want it to get too stiff or heavy. Part of the charm of these puppets is their light elegance and flowing movement.
HINT: When you go to store your puppet, you can store it hanging from the controller to keep it from getting tangled, or you can carefully wrap the string around the controller, then carefully unwrap it when you are ready to use it again.