| |
Shadow Puppets and
Their Presentation
Shadow puppets are
a mysterious and wonderful kind of
puppet. If you have ever made hand
shadows (used your hands to make shadows
that look like animals, etc.) on the wall
or have seen shadows cast by a flashlight
on a camping tent wall then you already
have an idea of how shadow puppets work.
What you need to create the magic of
shadow puppets is a screen on which to
project the shadows (-light must be able
to pass through it--it could be a sheet,
tent wall, big piece of paper, etc.) a
light source (could be the sun or an
artificial light --flourescent lights do
not work well) and a shadow puppet (an
object that will cast its shadow on the
screen.) Here is how it works:
The
light must shine onto the screen; then
anything placed between the light and the
screen will cast a shadow onto the
screen.
drawing
by Stephanie Holdermann
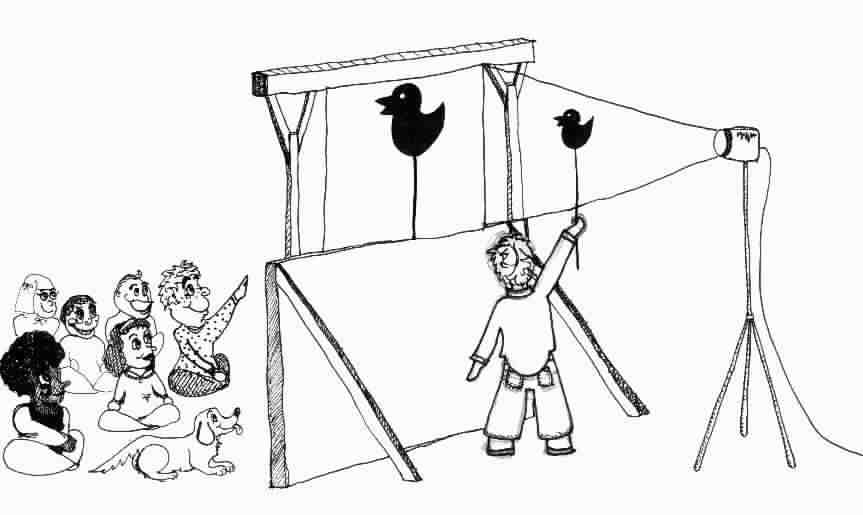
Fig. 1 Note that
the light shines onto the back of the
screen, showing the shadow of the puppet
(held by the puppeteer) while the
audience watches from the front of the
screen, seeing only the projected shadow.
Shadow
puppets are best viewed in the dark!
Notice in the
picture that the audience watches the
show from the other side
of the screen. They don't see the
puppets, they just see the shadows
of the puppets (that's why they
call it shadow puppets!)
Making
Your Shadow Puppets
What
you will need:
Heavy
construction paper or thin cardboard
(like a cereal box) or file folder type
material
paper (to
plan your design on) & pencil
scissors
hole punch
brass
brads
sticks for
the controllers (chop sticks, coathanger
wire, popsicle sticks, or bamboo skewers)
glue or
tape (to attach the control sticks) or
string (for a moving control stick, see
below)
black
paint or marker (optional) if your
cardboard is not a dark color
Let's
get started!
First you
must decide just what kind of character
you want to make. Although you can make
anything you want, let's try a duck just
to get started. For the simplest of
shadow puppets you can draw a picture of
a duck on your planning paper, transfer
the design to the cardboard, and cut it
out and paste it to a stick. (When you
are drawing the duck, remember that all
your audience will see of the duck is the
shadow, so any details you draw on the
puppet will not show.)
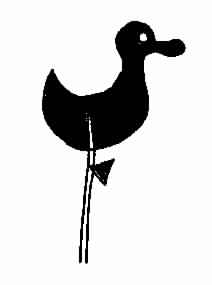
Figure 2. A simple
duck cut out of cardboard with a stick
glued on with which to hold it. Note that
the stick (shown white) also becomes the
duck's leg (helping to hide the stick in
the shadow.) To make the eye you can cut
a hole in the puppet head so that the
light shines through (remember, if you
just draw an eye, it won't show on the
shadow!)
Now, let's say you
want to make some part of your duck move.
You are ready for lesson 2 in making
shadow puppets. In order to make a moving
part for your shadow puppet, you have to
make that part separate from the rest of
the puppet. Let's take our duck example
and give him some movement. Take your
piece of paper and draw your duck outline
again. Then make a copy of your duck onto
another piece of paper (you can use
tracing paper, carbon paper, or just cut
out your duck while holding two pieces of
paper together, so that you cut 2 ducks
at once. Let's decide now what parts we
want to move. Let's make this duck have a
wiggly walk. To do so, we will make the
duck in 2 pieces, with the front half of
the duck separate from the back half.
Part of each "half" of the
puppet must overlap the other
"half" with a pivot in the
middle (this is where the brads come in
handy.) Let's draw our overlap in the
form of a circle on our duck drawings.
(see figure 3)
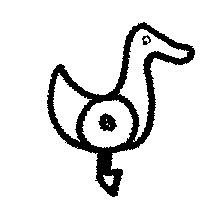
Figure 3 shows the
circle with the center hole marked that
will be the overlapping pieces of your
shadow puppet. When you cut them out,
each half of the duck will include the
whole circle with the hole (see figure 4,
below). Transfer the two pieces to the
cardboard and cut them out.
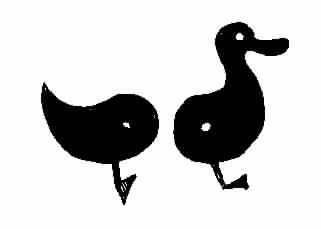
Figure 4 shows the
two pieces of the duck puppet, each with
the circle and hole, now cut out of the
cardboard and ready to assemble. Poke
your brad through the holes of both
pieces and you have a whole duck again,
but one in which the front half and back
half can rotate independently from each
other on the brad.
Now you are ready
to attach the controls on your moving
duck puppet. In the first duck (the non
moving one) we attached one stick. For
the moving duck we will need 2 rods to
control it, one to hold the front half of
the duck steady and one to make the back
half of the duck move up and down for the
wiggly walk. You can attach the first
control rod to the leg and foot (and
body) of the front half of the duck, just
like in the first puppet. Next you want
to connect the second control rod to the
back half of the duck. This rod must be
attached somewhere behind the pivot point
(so when you move it, it pushes up on the
back half of the duck, causing it to
raise up. It is good (though not
necessary) to attach this rear control
rod so that it will pivot. Instead of
gluing the rod directly to the cardboard,
you can poke a hole in the cardboard and
push a string through it. Tie a knot in
one end of the string so that it will not
pass back through the hole, and then
attach the other end of the string to the
rod (you can use glue or tape.)
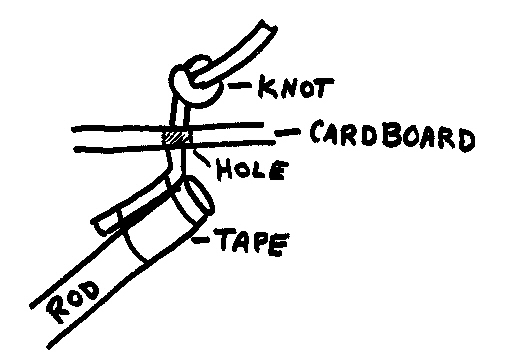
Figure 5 shows a
closeup of the knot on one side of the
puppet half, and the rod on the other.
This gives you a nice, movable rod
connection. Don't leave too much slack
between the knot and the rod and you will
have a nice, tight control.
Now, while holding
the forward control still in one hand,
use the other hand to move the rear
control up and down. It should give your
puppet a fun walking motion. Now do that
while moving the puppet forward on your
shadow screen. Your puppet walks.
Once you have the
idea of how to design your shadow puppets
you can make all kinds of different
puppets with different movements. Even
just using 2 pieces to make your puppets
you can make a great variety of fun
puppets. Use your imagination to make
different parts move. For example you
could make a man puppet and have one leg
and one arm move together (shadow puppets
don't have to be realistic!)
Now, look at the
drawing below and see if you can predict
what kind of movement you would get if
you attached these two pieces together
and attached the rods. What if you made
the "moving" part be the leg
and the "still" part be the
part with the head and arm? Or, what if
you made the leg part be the still part
and make the head, arm and other leg be
the moving part? Which would be funnier?
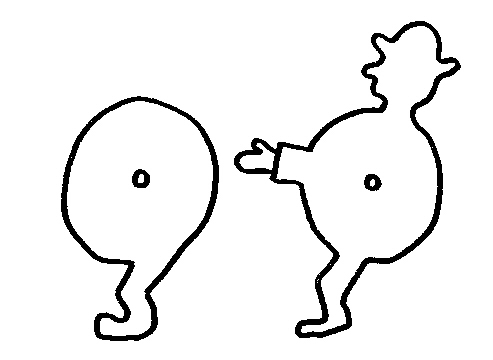
Figure 6 - An
example of a funny shadow puppet. In
shadow puppetry you are limited only by
your imagination! Go make some fun
puppets!
Some
final tips:
Use the
paint in the materials list to color your
puppet black (or a dark color). You will
get a better shadow that way.
If you can
not see your shadow puppet well when it
is held in the light, try holding it
right up against the screen. Some light
sources make crisper shadows than others.
(The rule about lights is the smaller the
light bulb filament, and the brighter,
the better the shadow. Quartz bulbs work
well, but experiment until you find the
light effect you want.)
To make a
colored shadow you can use tissue paper
over a cut out part of the puppet (for
example, you can cover the duck's eye
with yellow tissue and even draw in an
eyeball with black marker on the yellow
tissue.)
To make
scenery, cut out the silouettes of your
scenery and tape, pin or otherwise attach
it to your shadow screen.
|
Keep
informed of Magical Moonshine
performances and new projects:
Email a
request to be on our email list

Planning
that Special Event?
Whether it's a
holiday affair, a birthday celebration,
an arts festival or fundraiser, Magical
Moonshine offers a world of exciting
choices!
Interested in a show?
Email us or call
707-363-4573.
Choose
your type of event for more information-
Small shows
for private parties, holiday shows,
social clubs, family stage at arts
festivals, etc.
Educational
and Mainstage shows for schools,
festivals, fundraisers, theaters.
Special
shows for younger audiences.
Adult
birthdays, dinner parties, soirees.
|